Delinea Privilege Manager (formerly Thycotic, and Arellia before that) is a popular software solution which runs on endpoints and enforces configurable policies that aim to restrict application privileges. A key feature of this solution is that it allows administrators to implement the principle of least privilege, withholding administrative privileges from end users while still allowing certain actions to run elevated as defined in the solution’s configured policies. We will explore how these elevation rules can be enumerated and analyzed. Additionally, we will craft a binary which, when executed by an unprivileged user, will be automatically elevated by Privilege Manager to a high-integrity context.
The Local Database File
The rules enforced by Privilege Manager are synchronized to the local agent and saved in an SQLite database file located within the application’s “C:\ProgramData\Arellia\ClientItems” directory. This file is not encrypted, and if not protected properly can be accessed by unprivileged users. The data we are interested in for our current purposes is stored within the “ClientItems” table in the “Xml” column. Below is a snippet of the sort of data stored in this column.
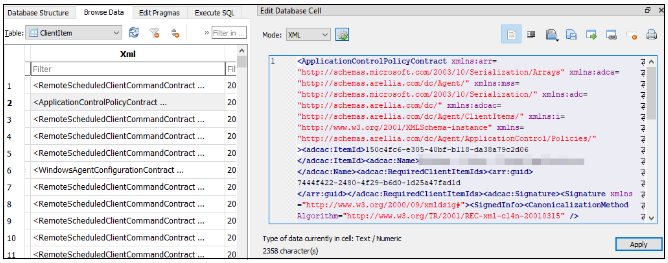
After digging through this data, it became clear that we needed a parsing tool to help us explore and better understand these policies without having to manually browse the database or manually review raw XML data.
Custom Parsing Tool
This parsing tool we created will query the XML data from the SQLite database and allow us to specify what kind of data we are looking for. We can list policy definitions, list filter definitions which can be used in policies, or retrieve a specific policy or filter by its GUID. We can also pass a flag to dump all interesting elements for each result returned.
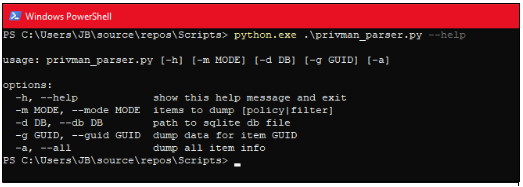
Armed with this, we can explore the solution’s policy and definition types a bit further to gain a better understanding of how it works.
Policy Components
Privilege Manager controls applications through items called Application Control Policies, which we will refer to as policies, that in turn reference other components called filters or contracts. These referenced filter definitions define the conditions under which the policy applies as well as what actions to enforce. Some filters rely on the executed binary’s digital signature, others on the executed binary’s location or other metadata. Some contracts will define actions that elevate the execution integrity, limit the process token privileges enabled and restrict things like child processes and file dialogues, or block execution outright. Below you can see some of the filter types available to get an idea of the solution’s capabilities, and thus the sorts of controls and criteria we will be dealing with.

A policy which only elevates binaries with a digital signature issued to specific trusted publishers is not going to be something we can practically leverage for offensive purposes. However, we will see next how we can discover policies with less strict filters applied which provide us with an opportunity to elevate our privileges.
Identifying Interesting Policies
First, we can use our tool to enumerate all policy names and look for something which appears to perform the sort of action we are interested in – namely, elevation. In this case, we find a promising candidate quickly.

We can then use our tool to query for all the policy’s details via its GUID and see a list of filters referenced by the policy. For each filter, we can likewise query the configuration details for each via its GUID to look for anything abusable. For example, below you can see there is a referenced filter that appears to target one of the Privilege Manager application’s own binaries.

Looking into this referenced filter’s configuration details, we can see that there is, yet another filter item referenced within this filter – a sub-filter, so to speak. This is where the criteria we are after are likely defined.

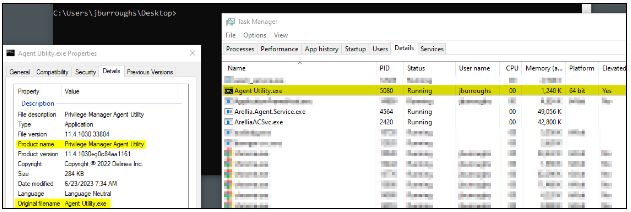
Recursing another level down into this sub-filter to view its definition, we can indeed see the criteria we were looking for. Interestingly, the only criteria we see here are PE file metadata property values such as “product name” and “original filename” – these should both be easy enough to spoof on a malicious binary to achieve elevation.

Achieving Automatic Elevation
Finally, we can start crafting our malicious binary in such a way that it meets the criteria defined by the policy’s referenced filters. For demonstration purposes, we can just take a copy of the “cmd.exe” utility and edit its metadata using a tool such as ResourceHacker. After copying this new binary to the target system and executing it normally, we can see that the Privilege Manager policy was successfully applied as the binary process was automatically elevated to a high-integrity context. It is important to note that other elements of the Privilege Manager policy may still apply, such as restrictions on specific actions our process may attempt or restrictions on privileges of any child processes our process may spawn. This means that we may need to repeat this process for any tooling we need to execute instead of just using our malicious “cmd.exe” utility to perform any privileged action.
Summary
As you can see, once we gain access to the Privilege Manager SQLite file, we can quickly start mapping out the policies defined. From there, if there are any gaps in the policies and filters defined, these can be leveraged by an attacker to achieve privilege escalation and execute code in an elevated context. Ensuring access to the SQLite file is properly restricted from unprivileged users is a great first step to reduce the likelihood of an attack like this. Ultimately, the Privilege Manager policies should be reviewed thoroughly to ensure they do not rely on elements which are fundamentally controlled by a potential attacker.
Written By:
 Jeremy Burroughs is an Offensive Security Consultant at Netragard working on a variety of assessments and projects including penetration testing engagements and team toolkit development.
With over 10 years of professional experience in IT and cybersecurity…>>Read Bio


